
Sistering Floor Joists
Sistering floor joists is a process to assist to the structural goal of framing in a house, which is to safely transfer building loads through the foundation to the supporting soil 1. While we refer here to the procedures for working with dimensional lumber in the US according to the National Bureau of Standards 5 and Canada 4 and working with I-joists 3, the process can be applied also to those joists made of steel 2.
Sistering floor joists is adding an extra identical floor joist, to a damaged or inadequate floor joist, and tieing the two together with screws or nails. It is a very effective way of adding the additional strength needed to hold up a sagging floor.
Sistering floor joists is the process of the addition of an equivalent floor joist to an older and inadequate floor joist made adjacent and sistered through adhesive glue and a nail or screw pattern with the objective of transferring the structural loads from the original floor joists to the sistered joists thus reinforcing the framing structure thereafter.
I follow here framing and sistering floor joists with traditional dimension lumber but giving some consideration to common engineered wood products as stated by HUD 6. Other wood framing methods, such as post-and-beam construction as in Europe 7, are just referenced here, although much of the information is relevant because after all, this is a process to transfer structural loads 8.
A floor joist is a piece of hardwood resembling a plank 9. When this board or plank is utilized in framing for structural and framing purposes, it is called a joist 10.
A joist is typically a load-bearing member that is configured to provide structural support in a building 11. The floor joists provide extra support to the floor above them 12.
They are generally constructed of heavier woods like Douglas Fir 13, Eastern White Pine 14, and Southern Yellow Pine 15.
To allow for wires and plumbing lines, floor joists are typically placed beneath subfloor 16.
In order to give optimum support for your home, floor joists should be spaced a maximum of 16 inches on the center 17.
The perimetral walls of the crawl space foundation, as well as a post or column-and-beam structure that runs through the center of the crawl space, provide support for the floor joists atop a standard crawl space. Although the peripheral walls of a crawl space might settle or shift, causing floor difficulties above them, it is more usual for the central supporting system to settle or sag, causing floor problems above them.
Older houses often feature floor or ceiling beams that have been deteriorated during the course of the building’s existence. Some contemporary residences also feature flooring that has been specifically created. Retaining the current joists by adding an additional joist alongside some or all of them is one method of strengthening these structures. The second joist is sometimes referred to as a sister joist.
In order to repair a sagging floor beam, it is usual practice to couple it with another block of dimensional lumber that is the same length and breadth as the sinking floor beam. A mechanical fastener such as nails or bolts is then used to attach this extra piece of timber to the sinking joist. “Sistering” a joist refers to the process of joining an “old” joist with a “new” joist.
When sistering a joist, there are a variety of options available, and not all of them require dimensional lumber. However, utilizing a same sized lumber is the most frequent way. Plywood, OSB, and even metal flitch plates may be utilized as a “sister” to a wood joist that has already been installed.
In the case of any kind of fractured floor joist, sistering them is an incredibly efficient means of repairing the problem. Even so, it may be a time-consuming operation since you may have to remove a completed ceiling, wiring, plumbing, HVAC, or other services that travel through the problematic joist in order to complete the job.
A sinking floor is the most obvious indication that there is a problem with the structural integrity of your home’s foundation. Houses with structural problems may have doors that stick or drag on the floor; damaged walls or ceilings; beams that bend; and foundation fissures, to name a few indications of trouble.
In order to ensure that the original joist is not compromised, you may sister it together with another joist. Utilize 3/4-inch plywood or dimensional lumber. The new block must be as broad as the old joists in order to work. If the existing joists are two-by-10s, for example, use two-by-10 dimensional timber or plywood cut into strips the same width as the existing joists. Using either material, cover the span of the joists. Before nailing the sister into place, apply a thin layer of construction glue to the old joist. As the floor shifts, squeaking between the joist parts is prevented by using an adhesive to strengthen the connection between them.
There are occasions when new material must be sistered to an existing joist that is weight-bearing in order to support a wall or additional weight. “Sandwiching” the old joist between the two new ones is the most common way to achieve this. In doing so, the joist is given an extra layer of support.
Sistering Floor Joists vs Scabbing Beams
The term “sistering” refers to a more comprehensive form of the term “scabbing.” As an alternative to connecting an additional component to the side of one section of the joist, this approach involves adding another full joist alongside the joist that is experiencing troubles. The result is the same as if you had replaced the initial joist, but you do not even have to go through the trouble of extracting the initial joist. Sistering may be utilized when the flooring above the joist sags as a result of the home being constructed to unsuitable specifications, or when the joist has decayed as a result of insect infestation or decay.
Joist Span Tables Useful For Sistering Floor Joists
| Sistering Floor Joists Help Table | Yellow Pine, Douglas Fir | Redwood Hemlock, Spruce | Western red cedar, Eastern white pine | |||
|---|---|---|---|---|---|---|
| Dimensional Lumber Sizing | Spacing at 16″ on center | Spacing at 24″ on center | Spacing at 16″ on center | Spacing at 24″ on center | Spacing at 16″ on center | Spacing at 24″ on center |
| 2×6 | 9′ 9″ | 8′ 3″ | 8′ 8″ | 7′ 6″ | 7′ 6″ | 6′ 3″ |
| 2×8 | 12′ 8″ | 10′ 8″ | 11′ 0″ | 10′ 2″ | 10′ 5″ | 8′ 6″ |
| 2×10 | 16′ 0″ | 13′ 0″ | 14′ 6″ | 12′ 4″ | 12′ 9″ | 10′ 5″ |
| 2×12 | 18′ 6″ | 15′ 0″ | 17′ 6″ | 14′ 4″ | 14′ 9″ | 13′ 0″ |
Sistering Floor Joists Cost DYI
The cost goes per joist sistered goes from $133 to $277 unless the older joists are 2×6 or 2×4 where I have a maximum of $305.
The cost is influenced by the access to the joist and the size of the dimensional lumber that is required. Larger dimensional lumber will require more nailing, and more construction glue to be applied, and more time in hours.
The duration is one working day per joist sistered working one person. However, this endeavor is very difficult because only one person has to sister and hold the weight of the dimensional lumber while proceeding to the nailing and actual sistering.
DIY Step by Step Sistering Floor Joists
I’d like to provide you with process directions on how to do structural repairs by sistering floor joists together along with weak joists in order to strengthen the structure. The added support that this project would give will be especially beneficial in older homes where the joists have sagged, fractured, or twisted.
Inspect your floor joists visually and you may discover that some are rotted in parts or have soft patches as a result of moisture absorption. It is critical rehabilitating such joists since they have lost part of their capacity to withstand a sufficient weight or structural load. In some circumstances, it is necessary to sister the joist that has been compromised.
Just as we explained, remember that the duration is a full working day with one person working and the DIY cost goes from $133 to $277 unless the older joists are 2×6 or 2×4 where I have a maximum of $305.
Tools Required
- Caulk gun
- Circular saw
- corded drill and bits
- Hammer
- Hearing protection
- Safety glasses
- Tape measure
- Safety gloves
Materials Required
- 16d nails
- Construction adhesive
- Hydraulic jack
- Joists
Process Steps For Sistering Floor Joists
1) Optional Structural Engineer Inspection
In the event that you are worried about structural integrity, you should first contact an expert to assess the floor and offer strengthening solutions that will remove the droop and put the frame in line with building codes.
The examination ($300-$500) will reveal any structural issues, such as joists that are too small, that will need the services of a contractor. You may be able to fix the bowing issue yourself by “sistering” new joists with the old existing joist. Of course, this is likewise applicable to rotten joists or sagging floors when reinforcement is also a requirement for the homeowner
2) Disconnection Of The Utilities
Remove any wires, pipes, or other obstructive elements first. Consult your local construction inspector if notching the new joists proves challenging. The new joists will be weaker if they have notches, however certain notches may be tolerated depending on where they are located.
Generally, no notching must be performed in the middle third of a joist, no notching neither in the bottom chords nor upper chords.
Remove any electrical, piping, HVACs, and other obstructions. These include disconnecting cables from the main switchboard, disconnecting pipes from valves, and taking out ductwork.
Taking out so many pipes, cables, and ducts might cause a joist to split in half for some homeowners or service providers. This is an alternative, but it is advised that you run a sistered joist the whole extent of the initial joist for the best subfloor support possible.
There are cases where we actually do not need that the new joist has the same dimension as the old sistered joist, which we will discuss later on. For now, just take the principle of the same length for the new joist and the sistered joist.
3) Clearance Of The Workplace
The placement of joists is sometimes hampered by the presence of services such as electricity, plumbing, and heating. Some of these impediments may have to be temporarily relocated or eliminated.
This happened to me in particular. My path was impeded by a few things: wiring, thermocouple cables, water lines for the fridge, the conduits for the electricity, and heating pipes.
The first step is here the temporary removal or relocation of the wiring and piping. A smoke detector and some other connections had to be disconnected because of this. Pulling wire staples, unscrewing conduits and thermal piping clamps were additional tasks I had to do. After the joist is sistered, all of these components will need to be replaced, and that one will be our last step in the process.
But clearing the workspace for sistering floor joists can be difficult when it is not an unfinished basement flooring.
An unfinished basement would not be an issue. It is possible that there will not be enough room beneath the floor if this is a post and beam structure. That may need excavating the region under the house, a labor-intensive task that must be performed manually; or the floor may have to be ripped up in order to obtain entry.
3) Measurement And Cutting Of The Sister Joist
Define how the joist will be inserted into position. By securing them to the previous joist, you may occasionally employ joists that are somewhat shorter than the whole range. More on that below, after the step-by-step process explanation.
A notch on the bottom edge of the joist may be required for installation on a foundation wall. There is no one-size-fits-all answer. Before beginning this repair, be sure to follow the IRC as well as the municipal building codification for notching floor joists and the building code for sistering joists.
Apply abundant construction adhesive on the older joist until it is covered completely in the lateral area wherein the new joist will be sistered.
When the sagging joists are level, apply a generous bead of construction adhesive to the existing joist. You must be wearing your safety glasses because you are working with wood to avoid the gravitational effects of the utilization of the adhesive over your head.
Set new joists usually of the same height as existing ones (with exceptions if your old joists are 2×4 (not allowed anymore) or 2×6 as I explain here) alongside the older joist.
Keeping the sistered joist’s dimensions consistent with the original joist is simple if you are operating with the identical length as the original joist. If feasible, employ the 2×3 rule for cutting a partial joist.
Thus, when the joist has twelve feet long, you will need a sistered joist with a minimum length of eight feet. This is a clear example of the application of that 2×3 rule.
The sag point on the newly added joist should be a minimum of three feet away (3´) from the endpoint of the new joist, so that the old joist may be adequately supported.
Construction adhesive and 3/8″ diameter bolts may be utilized to secure the sister connection, establishing a “W” arrangement with the bolts in approximately 8″ intervals. In the event that screws are used in lieu of bolts, employ three times the number of screws than bolts.
4) Locate The Pattern Farther From The End Of the Joist
Before predrilling, what I consider necessary here when working with hardwood, we have to define a pattern. We can utilize lag screws for sistering floor joists.
You can utilize screws or nails. Screws are better for holding power and nails are instead, better for shear strength.
Framing specialists and woodworking doctrine generally prefer nails instead of screws when sistering floor joists, in virtue of their superior shear strength.
The pattern, using nails, will be three 16d common nails driven every sixteen inches, but this is just a recommendation.
Of course, the nail pattern must be towards the center of the wood which means that you should not screw closer to the end of the wood. This is very important.
The closer to the end of the wood you are, the less binding forces you have in the fibers that will hold the would together, in the side towards the end, and the pressure of the screw going in can create a shearing force exceeding the biding force, causing the split.
Farther down the board the binding forces are greater along with the wood as there is more area and length on each side of the hole. This is also why it is easier to split thin wood in the center of the board with a small screw that will not split thicker wood.
This is a general principle because the definition above is also influenced by the dryness of the wood, the run of the grain, type of wood, and grade.
5) Predrill Lag Screws According To A Defined Pattern
Predrill and drive 3/8-in. x 3-in. lag screws: Our next step will be driving 16d common nails in old, hardwood is difficult. So in this step, we will predrill and drive 3/8-in. x 3-in. lag screws as I consider that we will have some issues nailing in the hardwood.
Sister the new joist to the old joist and nail both joists in a nail pattern of three 16d common nails driven every sixteen inches. Use also safety gloves.
It is very convenient to predrill. With the predrilling suggestion, I want to avoid a stress fracture in the joists. The larger the diameter fastener, the larger amount of wood that gets displaced.
Thus, the wood has nowhere to go but out away from the point where the pressure is being applied versus instead, removing the wood with a bit by pre-drilling, lessening the chance of a stress fracture.
6) Lodge The New Sister Joist Alongside The Original Joist
Remove any excess shims from either end of the new joist to ensure that it fits tightly against the original joist.
It may be problematic to install a full-sized sister joist to match against the old one because maybe you cannot find one. However, in practice, with dimensional lumber, it is easy to request in your favorite store the wood of the required length and correct grade.
Because of shrinkage or cupping, there may be less room between the beam or bearing wall and subfloor above your previous joists.
For those times when you can not get your sistered joint into place because of a tight fit, you may jack up the bearing end of the old joist slightly and cautiously. To avoid damaging the completed walls above, be very cautious while removing the old joists.
To remove the old joist, lay the piece of timber right below it as close as possible to the point where it is bearing on the beam or wall on which it rests, using a jack post or a floor jack. That way, your new sister joist may rest adjacent to the existing one.
You will also have to place jacks under the old joist to get it level if you are doing a partial joist installation. If the new joist has a sister joist, one option is to make that joist bold. Make sure the sistered joist is level by installing a bolt on both ends and checking with a bubble level to ensure that everything is tight and adjusted.
The drooping joists need to be supported by a beam. Unless the sag is behind a weight-bearing wall, hammering two 2x4s dimensional lumbers together will be enough to bridge three joists. It is best to level the beam by raising each joist by 1/8 in. daily, through the utilization of a hydraulic jack
7) Joining And Sistering Floor Joists
This process is similar if you use dimensional lumber or a single layer of 3/4″ CDX plywood on a side of the original joist. CDX plywood is resistant despite the lower grade of the veneer sheets (“C” and “D”) that compose this plywood arrangement.
Screws are better for holding power and nails are better for shear strength. In this article, I went briefly through both options.
Using Nails For Sistering Floor Joists As The Preferred Option
The best nails of sistering floor joists, and we can say, for framing in general, have to be 3 1/2 inches long. Nails that are overly longer than this or thick in diameter are hard to drive inside the wood and may splinter the joist, whereas shorter or narrow nails merely do not go enough through the wood.
Specialists utilize a collated 16d (3.5″) nail in their nailgun for framing walls. You will find that many best nail guns only go to 3.25″ despite the codification around it.
These 3 1/2 inches long nails are also called 16-d or 16-penny nails, and thanks to their length, they can properly affix 2 joists (the new joist and the old one together) of a typical thickness of 1.5”.
So are they too long now? No, it is true that there will be protruding ends on the other side of the wood, but simply nail them off, bending them back into the surface of the joist.
Alternate top, middle, and bottom nailing on a sistered joist every 6″. Nails will seem to be zigzagging over the sistered joist in this manner, like a kind of “W” letter, roughly speaking. Put three nails – one on top, one in the center, and one at the bottom – about two inches apart on each end of a partly sistered joist.
Utilizing Bolts Instead Of Nails For Sistering Floor Joists
You should utilize two 3″ lag bolts every 24″ if you are using bolts instead of nails. 4″ carriage bolts may also be used with the same spacing. To avoid splitting or cracking, bolts should be set 2 inches apart from the joist’s edge.
Make careful you use a generous quantity of construction glue while nailing or bolting. Do not save resources here. Sistering floor joists are probably one of the most important framing projects.
The adhesive, this construction adhesive will hold the fasteners in place and enhance the overall joist-to-joist connection, which is the most important component in this particular work: this is all about structural stability and ensuring that the new joist receives the structural load of the older joist.
8) Final Testing
Make sure that the new wood attached to the old joist is level and not bending or making noises when you walk on it from above before proceeding. Before the reinstallation of the utilities, you should address any concerns.
Imagine that you reinstall the utilities and you discover that the floor is still having issues or that the structural loads are not transferred to the new joist.
9) Reconnection Of Utilities
We have to reconnect the plumbing and the wiring installation that we have disconnected in one of our first steps.
Building Code For Sistering Floor Joists
There is not a building code for sistering joists as it is a reinforcement of an existing structure while codification refers to the primary design and construction standards.
Nevertheless, industry standards apply, establishing that the nailing pattern must suffice to transfer the load from one joist member to the new joist ensuring structural stability and that the joist blocking or bracing is maintained at a maximum of 4ft increments.
The non-written principle in building code for sistering joists, mostly an industry-standard I guess because there is no codification, is that the new joists are required to fulfill the support requirements, so that the nails must be sufficient to transfer the total load from one member to the other, from one joist to the other joist.
Because sistering joists are obviously not used in new residential construction, there is no section on them in the residential building code for that purpose. Houses are designed to be constructed on single joists with a predetermined spacing.
Sistering is only necessary if the house has been wrecked or if incorrect construction methods were employed, which the building code does not concern itself within this instance.
The code does require that all floor joists carry a minimum of three inches on concrete and at least 1.5 inches on wood. This also applies to sistered joists. Even if the original joist is incapable of bearing that load, the replacement joist must.
Additionally, you must have sistered joists if the joist is connected to a perpendicular header that is longer than 4′. This is often seen when joists are unable to run the whole length from bearing wall to beam owing to the presence of stairs. In these instances, a header is attached to both sides of the joists. Sistered joists must bear on both ends against a wall or beam.
I have a complete article to discuss the building code for sistering floor joists right here.
A building code 18 for sistering joists, or any building code in general, specifies minimum standards 19 in the design and construction of floor systems 20 and not their maintenance or reinforcement.
For this reason, there is not a building code for sistering joists as this activity is considered as a reinforcement of a framing structure.
Therefore, only industry standards of the structural engineering practice 21 apply in regards to sistering joists. Building codes, such as the Residential Building Code, that do not apply in Wisconsin 22 but a hybrid variation 23, do not refer to floor joists.
Likewise, some states consider them directly incorporated by law and adopted by reference 24. The US remains as one of the few advanced countries without a uniform building code 25, but finally, now all US states utilize the International Building Code.
This lack of uniformity is quite different from the European Union 26, whose mature codification is being adopted also outside the EU 27, such as EFTA countries 28, and has overwhelming adoption in the Asia Pacific region 29.
Solid, lateral supports that are fitted between floor joists for the distribution of structural loads are known as floor joist blocking. If the length of the joists is more than 8´, the blocks may be affixed either staggered or in a straight line mid-span.
Therefore, usually, 1 – 1/2″ bearing wherein the nailing is therefore required to be sufficient to transfer the full load to the other joist. In general 16-d nails will harbor about 100#. Most joists withstand 66#/ft, thus, a 16″ nail spacing arrangement should suffice.
A 1-1/2″ bearing may be acceptable in many cases, but for long spans, it is required to perform the necessary calculations in order to determine how much PSI (pounds per square inch) you are introducing on that segment as these calculations will inform you about the ability to carry loads accordingly.
Building Code for Sistering Deck Joists
Despite some differences between floor joists and deck joists, there is no building code for sistering deck joists as this procedure is a strengthening of a present framing structure whereas building codification entails directives for design and construction standards.
Requirements From Homeowners For Sistering Floor Joists
Adding beams adjacent to existing joists is a great technique to strengthen weak or broken joists or to fortify the system to accommodate the extra weight, such as a hot tub.
Which are the goals we want to achieve when we engage on a sistering floor joists project? Let´s see.
The most common case I see is that homeowners will utilize an area for living or sleeping quarters so they will add furniture and increment the weight also of the people themselves. Therefore, it is this change of destination of their previously underutilized rooms that obliges them to consider the reinforcement of the framing and this is the most common requirement in my own experience.
But there are many more reasons, please let´s see.
For unsteady or sinking floors or for the removal of decayed wood, sistering floor joists is a viable option.
An unstable floor in most houses is caused by a large joist span, joists that are set further apart, or joists that are structurally failing due to wood decay. A shaky floor may be fixed with a sistered joist in any one of these situations studied briefly below:
- Reducing the wobbling and the bouncing felt when walking.
- Reinforcement of the framing due to a change of destination of previously not utilized living quarters. The solution here is usually to reinforce older and weaker joists of dimensions 2×4 and 2×6 with stronger joists, sistering 2×8 or 2×10 to the original weaker joists even if they are in a good condition.
- Leveling the flooring and the reduction of the sagging effect and achieve this via sistering floor joists.
- Original floor joists that are damaged due to an improper nailing pattern, notching or, frequently, they are rot. Therefore, sistering floor joists enables to transfer the structural load to the new sister joist.
An example of a typical cause for sistering floor joists is to correct a sinking or sagging floor structure. Because they are inadequate or rotting, joists may be sagging over time and cause structural damage. It is also possible that they are placed at a distance that is too great for the span that they support.
In some instances, sistering one or more joists following the jacking of the existing joists to the necessary height would permanently correct the sag in the structure.
Finally, if you are able to do a visual assessment of the floor joists and discover that any are rotting in parts or have soft patches due to moisture damage, you should replace them immediately. It is critical to restoring such joists since they have lost part of their capacity to withstand a sufficient weight. In some circumstances, it is necessary to repair the joist that has been damaged.
Causes Of Structural Failure Of Floor Joists
I would like to visit now briefly which are the causes of structural failure that generate the requirement for sistering floor joists.
The majority of floor joists in residential buildings are made of natural or engineered wood. In order to increase the load capacity of these joists, they are occasionally duplicated or actually tripled, based on the area of the property wherein they are located and what the construction rules demand. So what causes them to fail from time to time?
Loss Of Integral Strength
The most common reason, from a quantitative point of view, is the decrease in inherent strength caused by moisture in the crawlspace area.
Crawlspaces often retain moisture as a result of exposure to wet earth, groundwater inundation, and outdoor humidity, among other sources. These conditions tend to dampen and degrade the wood, which can then lead to fungi and wood rot.
Water Damage
Water damage is another factor that contributes to joist failure. Water leaks may accelerate the decay of wood in a home, causing it to disintegrate more quickly.
Water will also naturally accelerate the deterioration and movement of an already sagging joist, further compounding the situation.
Termites are the final and very important cause of floor joist failures. Household termite infestations may cause severe structural failure of the house, resulting in the sinking and sagging floors and other problems.
Sagging Floors
It is not an error to say that sagging floors are not the cause, but the consequence of the aforementioned causes, such as loss of structural strength, water damage, and moisture in the crawl space.
An example of a typical cause for sistering floor joists is to correct a sinking or sagging floor structure. Because they are inadequate or rotting, joists may be sagging over time and cause structural damage. It is also possible that they are placed at a distance that is too great for the span that they support.
What I refer to here, is that the floor is wobbly or sagging because the joists are very separated. There are span tables for each type of wood, grade, and dimensional lumber code.
Here is where the requirement of sistering floor joists appears in order to transfer the loads from the original floor joists to the new joists that are sistered to the older ones with a defined nail pattern.
We have complete guides about sinking floors and sagging floors here.
Common Mistakes When Sistering Floor Joists
There are a lot of mistakes that you can make when sistering floor joists, and I think I made them all already myself at some point.
Most of the issues are related to an inadequate sistering that does not enable the structural load to be transferred properly to the new strong floor joist.
Original Requirement Remains Unattended
Most of the time, sistering floor joists is the solution decided to address a previous requirement from the homeowner: Damage caused by termites in the original joists, water damage originated by leaks in the pipes, rotting caused by the excess of moisture, or rotting caused by condensation and excess of humidity.
So the homeowner performs the sistering floor joists process thoroughly, but the original cause was never attended: There are still termites, there is still leaking in some pipes, the PVC piping is still broken, there is still water damage, there is still sewage contamination, there is still a very high moisture percentage because the vapor barrier is still punctured because it had only a 6 mil thickness, and we can continue with a list of requirements never thoroughly addressed.
Only at the end of the aforementioned process, you should attend to the problem of the rotten joists affected by that excess of moisture, and do it through the association of planks in that procedure that the framing industry knows as sistering floor joists.
- Issues when sistering 2×4 and 2×6 floor joists: I explain in this article the issues when sistering 2×6 floor joists and why you should sister them with a 2×8 despite the dimensional differences.
- Errors During Notching Joists: Joists that have been incorrectly notched cannot have their maximum depth exceeded by more than one-quarter of the joist’s length. The maximum amount of notching allowed in the outer third of the joists is one-sixth of the joist depth, and there is no notching allowed in the center third of a joist. Incorrect notching along any length of the board may have a negative impact on the structural integrity of a joist. The sister joist is a part of the floor joist construction and needs to follow the same notching rule. What would be the point of adding a sister and then weakening it by notching it wrong?
- Incorrect Joist Leveling: Floor leveling is a time-consuming procedure that may take many days. The reason for this is that raising one joist may cause the remainder of the home to settle in ways that were not anticipated.
- The New Board Is Not Leveled With The Sistered One: When sistering a new board to an existing joist, it is common for it to take several persons to hold it up until it is level. The objective of the work will be defeated if the new board is not leveled with the old joist.
- The Boards Are Not Correctly Fastened: Not understanding how to properly secure sistering joists together may result in structural issues in the future.
- Overlap Of Boards Is Not Sufficient And Does Not Transfer Loads: When determining how much the overlapping of the boards must be, it is essential to consider the weight loads on the boards. Failure to properly overlapping both boards might ensue in a subsequent sagging of the structure.
- Lack Of Weight Support Due To An Insufficient Analysis Of Loads: This occurs often in the case of load-bearing walls and other special situations when additional support is required to hold up a joist.
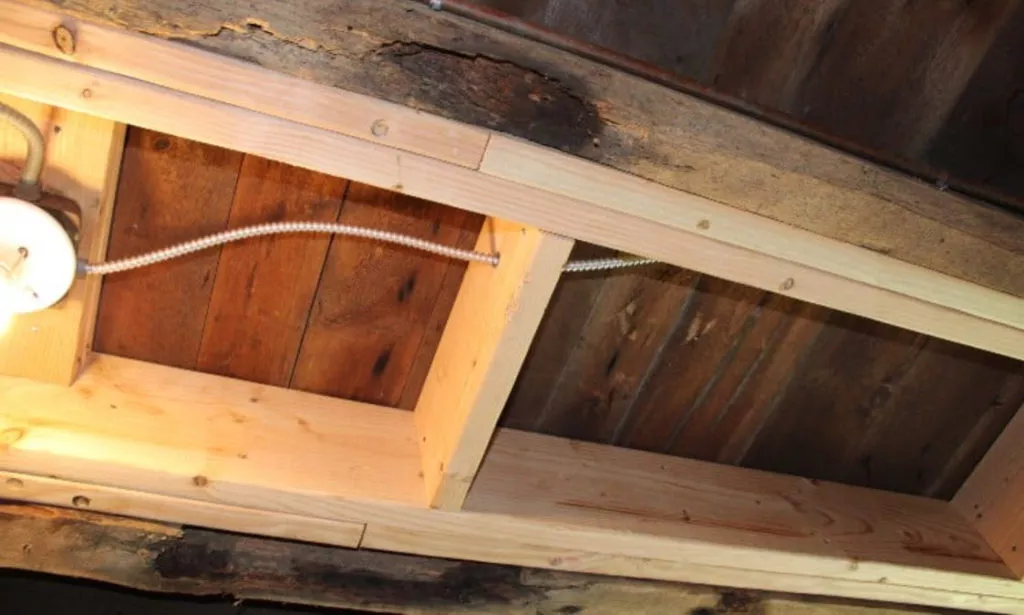
- The joist with the notch around the armored cable is useless. It has been compromised and is just adding weight to its sister, not helping to strengthen it. At 15 feet, the 2×6 joists are way over spanned as well and I explain the issues of sistering 2×6 floor joists right here.
- The joist bays must be free of any obstructions, such as electrical cables, ductwork, and plumbing, while you are doing the work.
- The nails must be sufficient to transfer the total load from one member to the other. Usually 1 – 1/2″ bearing wherein the nailing is therefore required to be sufficient to transfer the full load to the other joist. In general 16-d nails will carry about 100#. Most joists carry 66#/ft so 16″ nail spacing looks sufficient.
- Building permits can be required according to the entity of the work required, and with disregards of the fact that there is no actual building code for sistering joists being enforced.
Please allow me to address some of these typical mistakes that occur during the process of sistering floor joists, in detail below.
Incorrect Notching Of Floor Joists
Even though certain notches are unacceptable, based on their position as stipulated by the International Residential Code [IRC], other notches are permitted in certain situations. Here is a nice rule of thumb to keep in mind:
- Notches will be no deeper than one-sixth the depth of the joist in which they are located.
- Notches situated at the end of the joist must ot be deeper than one-quarter the depth of the joist itself.
- Keep the length of the notches to a third of the depth of the joist.
An aggressive notching pattern may alter negatively the structural integrity of the flooring upward.
So in simple words, I can explain it like this.
The maximum amount of notching that may be done at the end of a joist must not exceed a quarter of the joist depth. The maximum amount of notching allowed in the outer third of the joists is one-sixth of the joist depth, and there is no notching allowed in the central third of a joist. Incorrect notching may have a negative impact on the structural integrity of a joist.
Sagging or cracking floor joists that are significantly damaged or cracked might worsen in the future, which might cause the floor above them to worsen and lose leveling.
Sistered Board Is Not Correctly Leveled
In most cases, when a plank is joined to another joist, the newly added plank does not extend the complete length of the previous joist.
As a result, the end of the newly added joist does not get any further support. It is critical to establish this level in order to avoid the floor from collapsing and the sleepers from flaking later on in the process.
Floor leveling is a time-consuming operation that might take many days. The reason for this is that raising one joist might cause the remainder of the home to become settled in unexpected manners.
Sistering floor joists sometimes need the assistance of many individuals in order to get a level result. The goal of the project will be defeated if the new board is not leveled with the old joist.
Lift The Damaged Area So The New Board Does Not Require Carving
This paragraph is related to other problems here too. It is not very common but can be a mistake as well.
Generally speaking, 2x8s or engineered joists may be used to construct modern floor beams.
2x6s, on the other hand, might be found in older homes. Despite the fact that replacing the bad material with 2x8s is a good idea, a fit between the sub-floor and the ledge plate may be required.
The notches and debris may be removed in two rapid cuts, and the process is simple, but eliminating the notches in this manner compromises the structural integrity of the new wood.
Shaping and snapping the new joist into position might be a simple solution in circumstances where damaged floor joists are being joined with joists of identical proportions.
However, since the existing joists were destroyed, the floor has slopped, which cannot be corrected with this method. Give yourself a little additional time to raise the damaged region so that the newly added joist will not need any sculpting.
The Joists Are Sistered But Not Adequately Secured
The number of pounds that each floor plank is capable of supporting is absolutely astounding. Making these components fit together is simple enough; only a few nails are driven into the boards and you are good to go.
Nevertheless, possibly it is not enough so settlement, on the other hand, has the potential to work these open spaces and split the joists. Ideally, nails should be used to temporarily secure the section, followed by lag screws or, even better, transport screws to secure the two halves together.
Overlapping Does Not Suffice Carrying Loads Properly
When determining how much to overlap boards, it is critical to understand the weight loads involved. Failure to properly overlap the boards may result in future sagging of the structure.
With a few millimeters of overlap between the new wood and excellent wood from the previous joist, it is possible to get a professional-looking result. The wood is saved in this manner, but there is no protection provided for the planks. It is preferable if the boards are at least two feet apart.
Case Of Load-Bearing Walls
When we are dealing with load-bearing walls, more support can be required in order to sustain the joists.
Not Having The Required Build Permits
I discuss here the building code for sistering joists: not much to see there, but there are many regulations for floor joists therein.
Not using the correct joist dimensions
If you have problems frequently with 2×6 joists, you would have to sister them with 2×8 and have spans of not more than 9 ft. But this depends also on the species and grade of the wood being utilized.
Sistering Floor Joists Is Not A Process For Concrete Slabs
In this article, I only refer to sistering floor joists for crawlspace and basements. If you have a concrete slab foundation that you consider has an inadequate slope or grading or is sagging, your solutions will be related to slabjacking or helical piers.
Therefore, all the solutions herein proposed related to sistering floor joists are not applicable for you in this article, so I refer you to my articles about slabjacking and helical piers.
Partial Joist Sistering And Horizontal Shear: Length Of The Sister Joist
Whereas a full sistering joist will provide more structural strength according to most loading conditions, it is feasible to perform a partial joist sistering following the correct nailing pattern or bolt pattern that will occur when the selected pattern transfers completely the required horizontal shear developed by the load between the two joists.
The purpose of sistering a joist is to increase the moment of inertia of the joist at the location of maximum stress, which is usually, but not always with wood, in the middle.
Therefore, sistering a joist only in the middle is a good solution if the problem you are trying to solve is for example, an excess deflection at the middle of the joist, or a joist which is failing near the middle, but not failing on the ends.
The aforementioned issue is frequent, you can look at an overspanned joist and often the joist is fine near the walls where it is adequately supported, but not fine in the middle.
The key to making a partial sistering joist work is to ensure that the nailing or bolt pattern transfers a hundred percent of the required horizontal shear developed by the load between the two joists.
This horizontal shear should preferably be calculated by a structural engineer, whereas carpenters’ arrangements would be 10d or 16d nails 6 inches OC, staggered top and bottom.
A full sister provides more strength, but interesting not much more than sistering about half the joist, centered over the middle, for most loading conditions. So a partial sister is fine, it would be similar to scabbing if you cannot execute the entire linear length of the affected joist.
Just make sure you use a good nailing pattern or bolt pattern as I have described briefly above.
Length Required For The Sister Joist
All right then, sistered floor joists can be shorter than the original joist they are being sistered to. But how long it should be, how long it can be to accomplish its final goal that is to receive the structural load transferred by the original joist.
While no particular rule exists about the length of a sistered joist, a standard practice indicates that a sistered joist two-thirds the longitude of the original is sufficient – but only if the joist cannot be extended the whole length.
A sister joist that is not full-sized will nonetheless correct sagging in a joist, which is frequently alluded to as a “deflection” effect.
So the important thing if the sister joist does not cover the complete linear footage of the original joist, is that the structural load of the old joist is transferred to the new sister joist adequately.
If spatial availability is constrained and it is nevertheless required to repair a sagging or defective joist, you may only partially sister it, provided that the damaged section on each end is at least 3′ from the damaged region.
The sistered joist should be placed as far away from the site of deflection as possible. Sistering floor joists with one end at the deflection point will not significantly reduce sag.
When partly sistering a joist, it is critical to note that the manner the joists are fastened together is critical, since the fasteners will transfer the weight to the original joist.
Fasteners at each end of the sistered joist, assuming they are not bearing, would encounter higher force thus requiring a greater number of fasteners than the number of fasteners in the middle of the sistered joist.
Sistering floor joists do not need to go from bearing point to bearing point as it is not necessary for all damaged framing. It is not coded or mandatory at all that the sister joist has the exact same length as the older joist.
Sistering Floor Joists With Plywood
While it is typical to use dimensional lumber to connect sister joists, it is not obligatory. When it comes to contemporary floor joists, these are not always assembled with dimensional lumber, but with plywood. In. particular veneer sheets of C and D grade glued with exposure glue to bind the sheets, hence the letter “X”.
The floor joists of today are typically made of wooden I-beams or open web floor trusses. Not only are these alternatives less expensive than solid wood joists, but they also deliver less deflection, which is critical for ceramic tile flooring, granite worktops, and other contemporary construction materials.
Joining half-an-inch CDX construction plywood to both flanks of the affected floor joist results in a stronger joist than utilizing solid dimensional lumber. As with dimensional timber, this should be fastened using construction glue and either screws or bolts.
If bolts are to be used, then securing the plywood in place using a few screws while the bolt holes are bored and the bolts are inserted may be quite beneficial.
A third option, particularly to be utilized when at least one side of the existing joist is inaccessible, is to employ a single layer of 3/4″ CDX plywood on the accessible side.
We conclude the process just as we describe here for all sistering floor joists projects with the dimensional lumber sister or with a dual 1/2-inch plywood: construction adhesive and 3/8-inch bolts should be used to secure the sister to the original joist.
Sistering Floor Joists Deflection
It is not necessary to jack up the first joist to get the benefit of securely sistering floor joists. The first joist is stressed because of the load on it, hence taking a deflected shape.
This deflected shape is adopted because all stressed structural elements tend to bend due to the stress. If you jack the first joist back to level before you proceed to the sistering, so before you sister joists, there can be some structural issues to face.
The first joist has probably taken a permanent deflection since wood is an inelastic material that takes a permanent set after it has been exposed to load for a year or more. You can see this in any old house, the floors are out of level because the joists have permanently deflected due to the load. Even if you remove the load, the joists will not spring back to their original shape.
If you, nevertheless, force them back to their original shape by jacking, you are effectively prestressing the joists in the opposite sense of their deflection, so you may end up in a situation where the top of the joist is no longer in compression, it could be in tension while the jack is in place.
Then when you nail on a sister, you are locking in the reverse stress in the original joist, and you can get a wide range of stress results when you release the jack and reload the joist pair.
If you, on the other hand, do not jack the joist back up but simply nail on the sister, the two joists will share the load.
They will share the load approximately evenly as long as the two joists are fastened together sufficiently well that the horizontal shear which develops when the two joists are loaded gets shared.
The mechanism for horizontal shear transfer is the nails, bolts, or glue that holds the two together. Thus, horizontal shear depends on the adherence arrangement used (nails, bolts, or glue)
If you forget to nail the two joists together, The highest joist will carry all the load, until it deflects far enough so the second lower joist begins to pick up the load.
This is not a compliant structural arrangement, since the first joist could conceivably crack before the second joist picks up the structural load, then the second joist can crack some time later too since the first joist is no longer contributing much strength.
This type of failure occurs too in industrial and commercial projects where two structural elements were not properly connected, and become loaded, overloaded I would say before the fastening is completed.
Rotting Risks For Sistered Joists: Using PT Lumber (Problem Mostly For Decks)
This situation applies mostly to decks, because they receive more humidity. You can put insulation in the joists, such as the Fiberglass R21 batts. There are other options, but I have used that one, and works fine.
The problem is that moisture gets in between the two joists and does not dry out. Rot quickly sets in, and the side-by-side joists soon turn to mush.
I hear homeowners talking about “dry rot”, that they have “dry rot” in a joist and that is why they require sistering floor joists. I tell them that that cause is always moisture. The joists are looking dry now, but the joist became rotted when it was damp and humid.
Caulking the top of sistered joists may delay decay but probably will not ensure long-term protection.
Inserting new joists halfway between the existing joists may work. The use of pressure-treated joists is a good solution, but good-quality, straight PT lumber stock is not always available. Decks should be framed with PT lumber, pressure-treated lumber which is what PT stands for here.
Pressure-treated lumber is wood that has been infused with chemical preservatives to protect the wood from rot and insects. The wood is placed in a depressurized holding tank that removes the air and replaces it with a preservative.
If you must sister joists, I recommend using 1/2-inch spacers to separate them (1/2-inch nuts on staggered carriage bolts work well), creating an air space that allows drying between the joists.
So you can space joists with 1/2-inch to 3/4-inch strips of pressure-treated wood. Space them vertically 12 inches to 16 inches apart and through-nail. The lumber contact issue is not just limited to sister joists, either; a built-up beam should also be capped to avoid rot problems in the future
Is PT lumber the only option for decks? No, let´s see other possibilities.
One possibility is dimensional lumber made with southern yellow pine as it generally bears chemical treatment better than does the treated Hem fir and Douglas fir used in the West. To this possibility, is what we base completely this article: sistering floor joists with dimensional lumber
If the boards of the deck are also removed as part of the project, then instead, you can cap the sistered joists with a waterproofing layer such as Grace Vycor Deck Protector, York Shield 106, or strips of #30 tar paper (30-minute grade) to keep water out of the joint. The tar paper referred here is the same used in roofing, it is a waterproof material.
Alternatives To Sistering Floor Joists
Sistering floor joists is not the only possibility or technique that is viable to solve the issue of sagging floors, or unleveled floors. Let´s see briefly some alternatives we have.
Scabbing As An Alternative To Sistering Floor Joists
Scabbing applies when the problem is minor.
After all, a scab, the process called scabbing, works always in the same way, a piece of lumber utilized to join to adjacent pieces of timber together to increase their overall structural strength.
So it is not wrong to say that scabbing is like doing a partial sistering, in a way.
However, the most structurally sound approach, going from bearing point to bearing point, just as the original one did. And this applies whether we are discussing about a block wall, a pier wall, or a stem wall.
Scabbing entails permanently attaching a plank to one of the sides of the joist above covering the affected region thereof. Scabs may be fastened to one or both sides of the joist, with the latter being the preferred choice because to its increased strength and endurance. Scabs may be glued and screwed together to form a very strong link. This procedure may be appropriate if a joist has a minor rotting region and not still degraded to the point of replacement.
In any scabbing or sistering floor joists project, a fresh plank is sistered to the damaged joist. Typically, the added segment of timber is the same length as the existing one. When this is not practicable, shorter pieces are utilized in place of the longer ones.
Sistering floor joists is very similar. In sistering, rather than adding an extra piece to the side of the joist that is having trouble, you add a whole new joist next to the one that is having problems.
If you have to reinforce the entire joist, we would be talking about sistering floor joists. However, you will notice that some contractors and some other colleagues in other websites define scabbing as a partial sistering and the definition is fine.
Jack Posts: Lifting Floor Joists using Jacks
Damaged joists generally signify sinking floors. So leveling the floor means raising it again.
This process is about the installation of a screw jack and a beam below the sagging joists to push them up and raise the sagging floor.
Essentially, a screw jack is a metal support post that may be raised or lowered by rotating an internal threaded steel pipe, working in a similar way as an hydraulic jack.
Professionals will use numerous jacks to elevate the weight of the floor if there are major sags in many joists.
Any time you lift a home, there is a chance something may be broken. Lifting floor joists may harm paint, drywall, flooring, countertops, and trim, among other things. This is because they are heavy. Lifting must be done with care, yet it is impossible to prevent all damages.
Heavy-duty metal pipes with a raised threaded platform on the top are known as jack posts. You may use a jack post to elevate and stabilise the middle of a sagging joist by positioning the jack post below the center of the joist and turning the top platform so that it is driven up underneath the joist. Jack posts are supposed to be kept permanently in place, however a permanent post may alternatively be erected in that spot in order to reuse the jack posts in the future in another place.
Replacement Of The Affected Floor Joists: Using Jack Posts
Instead of sistering floor joists, you can replace the affected joist if the issues are important and sistering will not help because the old joist is infested with termites: there is no wood to sister, no actual plank that could transfer any load to a new joist.
The most challenging element of replacing a joist replacement is frequently inserting the extremities of the newer joist into the area where the previous joist was. Before removing the broken joist, make sure the surrounding floor is firmly supported using jack posts.
In practice, you may not need to replace an entire affected joist in cases that are different than the ones described above. This is because with the process of sistering floor joists, you can simply make the old joists to transfer the structural loads to the new joists and the objective is accomplished.
Timeframe For The Replacement Of The Floor Joists
Jacking up a joist and leveling a floor that sags or sinks is a standard home service process. The duration depends on how much leveling is required. The expected duration is one month for each quarter of an inch leveling. If the floor requires a typical leveling of two inches, the screw jacks should be raised gradually during several months,
If you want to raise the flooring by more than half an inch, you should do it gradually to prevent harm. In certain cases, this means the screw jack is only elevated once a month, with just a 1/4-inch increment each time. Obviously, if the sagging curve is more than an inch or two, this procedure will take awhile, much more time. After the walls and ceilings have been jacked up, more cracks might be expected to appear.
Engineered Wood For Sistering Floor Joists
Engineered wood joists are slowly replacing 2×10 dimensional lumber in framing projects and thus, in sistering floor joists initiatives. They are easy to utilize and relatively light, although more expensive than dimensional lumber 2×10 boards. We already discuss engineered woods for structural framing projects in other articles, so in this one, I just want to analyze how to handle engineered wood in the frame of sistering floor joists approaches.
I-Joists Of Engineered Wood For Sistering Floor Joists
We have already studied in other articles what are the I-beams and analyzed their structural stability, the configuration of the web and the flanges. Therefore, now we will describe how I-beams work in sistering floor joists.
Pre – engineered wooden beams are structural, load-bearing planks. An engineered joist is often supplied in custom length and since they are lighter, they offer the benefit of being readily handled at the worksite as they do not require expensive handling equipment. Their “I” design offers strong tensile strength and flexural toughness properties.
The “I” design is made up of a horizontal flange at the top and a vertical section known as “web” at the bottom. Lumber flanges vary in thickness from 1 to 2 inches and width from 1 to 4 inches and are produced from laminated veneer timber or laminated structural lumber.
7The “web” or vertical segment or vertical section, is commonly composed of OSB (oriented strand board) being 3/7 inch or 7/15 inches of thickness, depending on its purpose in a home installation.
It may be difficult to join an engineered I-beam to a conventional plank of dimensional lumber since the diameters of I-beams and dimensional lumber do not always match up.
As well, I-beams feature a flange – the top and bottom – with a thinner web between. Sistering a joist also requires the insertion of a filler piece to be inserted between the web and sistered joist.
Because I-beams tend to be hard in matching their width with dimensional lumber, it is more customary to sister engineered planks with CDX plywood or oriented strand board. Sistering the enginereed wood plank along the entire longitude of the original joist is still recommended in these situations.
The majority of these I-Joists or engineeered wood planks possess a one-inch gap between the “web” or vertical section and the outside edge of the flange. Two layers of half-an-inch plywood or OSB will be required to cover the hole. After you have completed the filling of the vertical section or “web”, utilize ¾” CDX plywood as the new joist, making careful to continue to alternate your plywood over the top of one another.
However, since you are joining two thinner pieces of dimensional lumber instead of two conventional ones, you will need to use shorter nails (8-d or 8-s), rather than the longer 16-d or 18-d ones described and recommended above when we defined the standard sistering floor joists process with dimensional lumber of STANDARD measures.
Laminated Veneer Lumber Floor Joists
Laminated veneer lumber (LVL) is an engineered wood product that uses multiple layers of thin wood assembled with adhesives that can be successfully utilized in sistering floor joists projects. LVL, engineered wood, and CDX plywood are interesting alternatives to dimensional lumbers.
In the rare event that you come across LVL (laminated veneer lumber) floor joists, which are scarce owing to their high price, you may use them in the same way that you would dimensional timber. Try to select timber that matches your LVL joist’s width.
Because LVLs are often utilized for greater spans than dimensional lumber can cover, it is unlikely that you will be able to replace the joist entirely. Sistering dimensional lumber is the same process as sistering floor joists with LVLs.
Please refer above to our description of the sistering floor joists with plywood, preferably CDX plywood. Plywood are also veneer sheets assembled in layers. In this case, we have sheets of “C” and “D” grade glued with “X” that is the “exposure” adhesive.
Floor Joists Vs Band Joists: Differences With Sistering
Do sistering floor joists concepts referred in this article apply also to band joists? Let´s see how they are related.
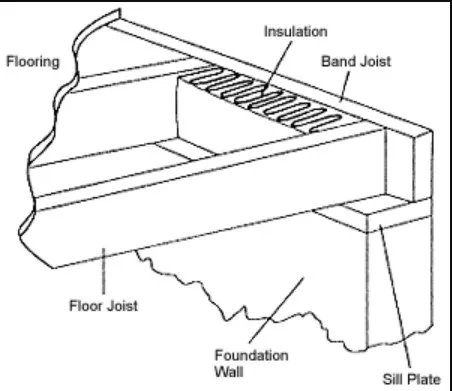
In the subfloor, a floor joist is a piece of wood that extends from the joists to the sill plates. In most homes, the main beam is used to support the rafters. If your floor joists have been destroyed, you’ll notice gaps in the flooring, or areas that are higher or lower than others. Joist failure occurs in low locations, whereas joist failure occurs at higher elevations due to lower load-bearing capacity and intact floor joists.
You should fix your floors as you would your band joist. It’s possible to harm the subfloor and the flooring even if removing a single floor joist doesn’t affect the overall floor structure.
This is still a terrible idea since many builders use both nailing and glueing to secure the flooring in place. No one wants to pay for the additional price of having to repair a tile or hardwood floor.
However, sistering floor joists is simpler than sistering a band joist. Having more joists means there are fewer jacks needed to secure the flooring, which is simpler to achieve and does not need so much space to access.
Sistering Floor Joists Costs
Sistering floor joists costs are from $107 to $386 per joist.
Sources And References
- Lee, B. J., Knapp, M. C., & Dalrymple, G. A. (2018). Evaluation and Strengthening of Existing Wood Framed Structure. In Forensic Engineering 2018: Forging Forensic Frontiers (pp. 893-902). Reston, VA: American Society of Civil Engineers. Accesed February 2 2022.
- Shahnewaz, Md & Islam, M. & Ahmadipour, Moein & Tannert, Thomas & Alam, M. Shahria. (2017). Reinforced Wood I-Joists with Web Openings. Journal of Structural Engineering. 143. 04017022. 10.1061/(ASCE)ST.1943-541X.0001747.
- Ching, Francis D. K.; Winkel, Steven R. (2016-03-22). Building Codes Illustrated: A Guide to Understanding the 2015 International Building Code. John Wiley & Sons. ISBN 978-1-119-15095-4. Information accessed February 2022.
- “About ICC”. Retrieved 2013-12-08. Search was sistering floor joists.
- Canada, Government of Canada. National Research Council. “Codes Canada – National Research Council Canada”. www.nrc-cnrc.gc.ca. Retrieved 1 October 2021.
- Northampton Borough Council, Building Control – regularisation charges, accessed 1 February 2022

