
How To Remove Water Heater Element Without Element Wrench
Normally, to remove the water heater element you have to utilize an element wrench as they work well almost always. But sometimes, particularly if the heater element is old, it corroded or rusted. Then you may have to resort to something a little bit more substantial and this is where we ask ourselves how to remove water heater element without element wrench.
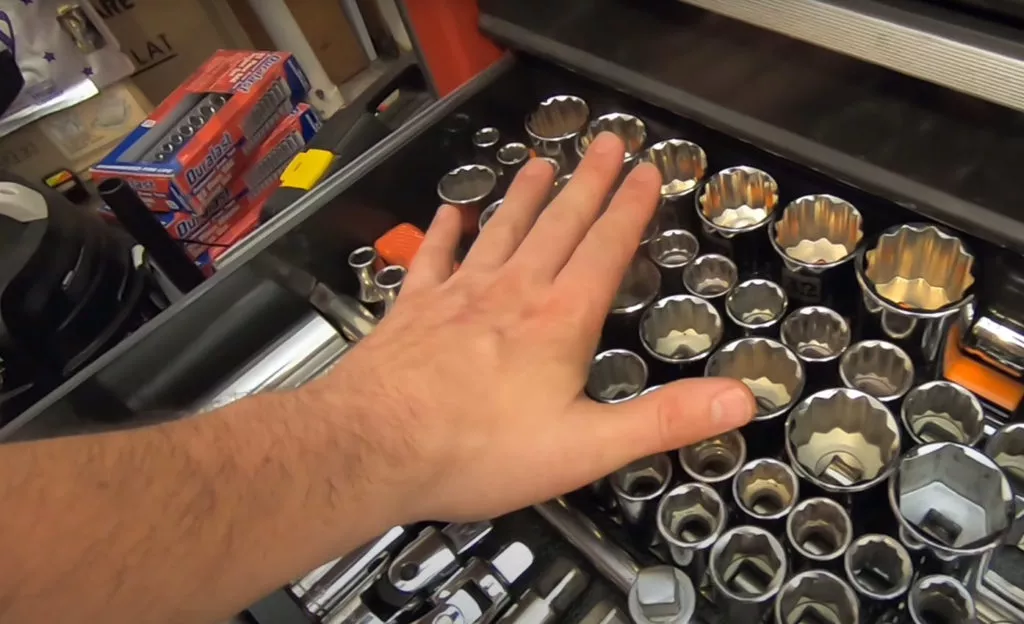
To remove the water heater element without an element wrench, a socket of 38mm has to be utilized. The reason is that it enables more torque as a rotational force than an element wrench for the same axis of rotation, which is very important when the water heater element is subject to corrosion or rust.
In the case that you have the possibility to do so, it is better to purchase an element wrench as it can cost only four dollars. The solution I provide in this article about how to remove water heater element without element wrench applies mostly in cases of corrosion or rusting wherein the element wrench would not work as needed. This advice applies also to mobile water heaters, provided that they have a tank.
Here you can use a pipe wrench or pliers instead of the element wrench. Furthermore, breaker bars might also become utilized for the removal of an element wrench as they are hollow steel pipes that may likewise join adequately over the heater’s socket wrench handle. I think that the solution that I describe step by step below is better.
You should utilize in normal situations an element wrench to remove the water heater element. It is contrived exclusively for the removal of electric water heater elements and comprises an ample muzzle or mouth that joins adequately over the exposed part of the water heater element.
When you have a stubborn water heater element that you cannot get out you need to acquire a socket. Sockets come in different sizes and flavors, but they’re all standard inch and a half (38 mm).
How to remove water heater element without element wrench?
Step by Step How To Remove Water Heater Element Without Element Wrench
Supplies
- 38mm socket
Tools
- A voltage tester is handy to ensure that no electricity is going to the water heater after we switched off the circuit breaker
- Hose to determine if sediments have clogged our drain valve
- A screwdriver, in order to remove the cover for the access panel
Time needed: 8 minutes
How To Remove Water Heater Element Without Element Wrench in a few steps
- Switch Off The Circuit Breaker.
Ensure that the circuit breaker at the electrical panel has been turned off. With the help of the voltage tester, it can be determined that there is no electricity reaching the water heater. The most important safety item to consider when removing the element of a water heater is that there is no power present.
- Attachment Of The Hose
Without any power present, begin the attachment of the hose onto the water heater. The purpose of this step is to determine if any sediments have clogged our drain valve at this point. In the process of doing this step, we do not have to drain our water tank.
- Turn Off The Water
In order to complete this step, we need to shut off the water. Putting the water supply off is as simple as closing the water inlet valve, which is an easy thing to do and which can be seen above the water heater. By allowing the air to enter the tank, we will be able to release the hot water within the water heater. The final step in this process would be to open the tap closest to the faucet in order to turn on the hot water.
- Removal Of The Access Panel Cover
The cover of the access panel has to be removed. Our method of removing the cover for the access panel will be performed utilizing a screwdriver. A plastic cover is also visible on the thermostat of the water heater. This needs to be gently removed. At this stage, the wiring must also be inspected. Do any parts appear damaged or melted? We must realize that any damaged wires must be replaced immediately in order to prevent further damage. To detach the heating element wires from the element, we will need to loosen the screw.
- Removal Of The Water Heater Element Without Utilizing An Element Wrench
Now is when you can utilize a socket instead of the typical element wrench: Socket will be a standard inch and a half (38 mm).
- Wipe The New Element Before Its Installation
The new element can now be cleaned and wiped. In order to prevent contamination and debris from being transferred to our water heaters, we need to take certain precautions. We will then attach the new “O” ring to our new heating element. Once the “O” ring has been attached, the element can now be gently inserted into the heater’s tank and tightened with the element wrench. It is not recommended to use a standard wrench for this procedure.
- Refilling The Tank Of The Water Heater
The drain valve should be closed, and the heater’s water supply should be turned on. At this time, I do not suggest that the power supply be immediately turned on. It is important to ensure that our tank is full before turning on the power. Currently, a half-full amount of water can potentially damage the heating element. In the next step, you should examine the newly installed element for signs of leakage. In the event of a leak, turn off the water supply and continue to tighten the element. In some cases, the “O” ring may also need to be repositioned.
- Replace The Thermostat Cover And Switch On The Circuit Breaker
The thermostat cover, the insulation, and the access panel cover can now be replaced after the filling of the tank has been completed. Upon completing the replacement of the covers, we can now turn on the water heater by switching on the circuit breaker again. Initially, there will be an inconsistent water flow when we open our faucets as a result of the air inside the water heater, but this is quite normal. The problem will eventually be resolved after a short period of time.


Can’t Turn Element
Your best tool for the job is a socket wrench