
How To Repair A Bowed Or Buckling Wall
Walls are not supposed to curve inward; this unnatural shape is a warning sign that your wall is moving and will ultimately collapse if not repaired.
Buckling walls don’t happen overnight; it’s a gradual process that happens over time. The first sign you have a problem is a long horizontal crack in the wall, or stair-stepping around the blocks. Once the cracks form, it’s easier for the existing weight and pressure to force the wall to bow.
Buckling Wall Repair Cost
customers paid an average of $5500-$6500 for these services. Three things will influence the overall cost of repairs to your home: how far has it bowed, what is outside of the wall, and how long the wall is. Each of these is contingent on which repair option you choose to use.
A wall that has bowed less than 2” can be repaired with carbon fiber strips applied to the wall using industrial strength epoxy for about $5,000.
If, instead, the wall has moved more than 2”, steel strips will need to be installed and anchored to the floor joists for as much as $15,000. Here we can utilize a wall anchor or a helical tieback.
The difference between those repair methods is which one is a better fit for your property. Anchors need to be installed outside the foundation, about 10 feet away from the wall. If you don’t have the room- or something very important is installed at that location- tiebacks are a better option.
I have a detailed article about foundation repair cost that covers thoroughly the buckling wall issue as well as the similar issue of the basement wall that caves in.
Symptoms Of A Buckling Wall
Visual identification
Sometimes you can visually notice a buckling wall. Also, you can measure this inward inclination with a plumb.
Wall cracks
Horizontal or stair-step cracks are common when a foundation wall tilts or bows. If your foundation wall is made from concrete blocks, you might notice diagonal cracking between individual blocks.
Uneven Windows And Doors
A more subtle yet still useful identifier of bowed and buckling foundation walls is an unevenness in your home’s doors or windows. Your foundation and your home overall aren’t built to accommodate significant shifts in the ground. When hydrostatic pressure exerts enough force to push the foundation out of its original position, the frames of the windows and doors can become misaligned with the windows and doors themselves. As a consequence, when you try to open or close them, you may face more resistance than usual or find they simply don’t swing or slide into place as they should.
Causes For A Buckling Wall
Excess moisture in the soil around your home can cause expansive soils to swell and also cause hydrostatic pressure strong enough to cause your basement walls to bow inward. This pressure and bowing puts stress on the basement walls to crack and lose their strength. Since your basement walls are a key part of the support structure of your home, other serious problems can be caused from the basement up to the roof.
Hydrostatic overloading is a common cause of wall failure, but it is not the only cause and we have to analyze the functions of a basement wall and the distress that it can withstand as per design. For example, for a 10 high wall, free groundwater will increase the loads on the wall by 25 to 30 percent.
A basement wall is a restrained wall. That means that the top of the wall should not move at all. If it does, it will shift whatever is sitting on top of it.
The typical retaining wall that you see is an unrestrained wall, it is designed to tilt slightly to allow the soil to carry some of the load and it is a safe foundation.
This is where the 1-inch deformation rule of thumb comes from. A typical description of the distress suffered by a bowing basement wall is consistent with an unrestrained wall acting as a restrained wall. The normal soil loads on the wall caused it to tilt, but the house framing prevented the top of the wall from shifting.
Therefore, the upper part of the wall cracked and bowed outwards, while the middle part buckled or has caved in. The deformation that translates into an inward curve is permanent. It will not ‘spring back’ once the water table lowers, or the hydrostatic pressure disappears.
The problem with unrestrained walls and clays is that initially, the wall tilts, and the soils carry some of the load, as it is supposed to by design. Over time, many years, the clay soil creeps towards the wall, increasing the soil loads on the wall. The wall then tilts in response to the higher loads, as it is supposed to as per design, and the entire process begins again.
Over 30 to 50 years, this process can cause a wall to tilt 1 to 2 feet.
Before you do repairs, you need to determine if the wall tilting was caused by hydrostatic loading or hydrostatic pressure, or an underdesigned wall.
If it is hydrostatic pressure, it would have occurred quickly in response to very heavy rainfall. This happens too in crawlspaces, they get flooded frequently, but only after a heavy rain, instead of standing puddles of water.
Is the basement wet? Are there indications of water flowing through the wall, was there a very wet winter, is there a roof downspout just above the damaged section of the wall, the bowing wall? Has the bowing basement wall process been going on for several years?
Is there reinforcing steel within the wall? Something anchoring or underpinning the wall such as an anchor, a helical tieback, or a Powerbrace treatment?
If not, then exterior reinforcement will be of little help as there is nothing for them to support. The best thing to do is rebuild the wall as a restrained wall.
Poor Yard Drainage As A Cause For Basement Buckling Walls
Usually caused by poor yard drainage. This water adds weight to the soil and forces pressure on the walls of your basement. Over time this pressure can cause the walls to crack and buckle inward weakening the structure of your home and potentially causing basement water leaks.
Let´s go through lateral pressure and hydrostatic pressure below. You are not wrong if you are thinking that all these causes are very much related and that poor drainage in your yard is the mother of all causes for having a basement buckling wall.
Lateral Pressure
The reason why foundation walls bow and buckle depends on the amount of pressure soils place on the structure. Here are four common factors that cause issues structurally:
- Soil type plays a big factor. Different types of soil create issues for foundations.
- The amount of moisture the soil contains. Less moisture is key.
- The location of the foundation. If it’s further underground, there can be bigger issues.
- The temperature. Hot and cold weather can cause soil to collapse walls or cause them to lean.
Basement walls are designed to support your home, which exerts pressure from above. The soil around the foundation presses in from the sides. In the foundation industry, we refer to this as lateral pressure.
Hydrostatic Pressure
The soil that stands around your property absorbs rainwater and becomes expanded towards the foundation. This expansion is not downwards, as gravity, but lateral. To the walls of the foundation. This lateral pressure originated by the expansion of soil because of water absorption is the hydrostatic pressure.
Runoff from gutters and downspouts are a source of water to increment the hydrostatic pressure.
If roof runoff is not directed away from your foundation, the soil around the foundation will become heavier and more expansive as it’s saturated with water.
If it isn’t directed away from your home’s foundation, it can become oversaturated with water. The soil is heavier which is why it’s able to shift, bow or buckle the foundation.
The combination of lateral and hydrostatic pressure? Highly problematic. Your foundation isn’t always going to be an immobile object. If your soil exerts enough pressure, your foundation can “give” a little bit and crack. And once there’s a weak spot, pressure will continue to win the battle.
In the past, the only way to fix a buckling wall was to replace it. Fortunately, there now are methods that don’t require invasive construction. Some of them don’t even need excavation- the walls can be repaired from inside your basement.
Repairing Processes Against A Buckling Wall
Below we will analyze three repair methodologies that are uses against a buckling wall, depending if the curve angle is less than two inches ( carbon fiber straps) or more than two inches (wall anchors or helical tiebacks).
These methods below will ensure to stop the advance of the inward curve for the buckling wall. If you want a permanent solution and strengthen back your basement wall, then we have to decide for wall straightening, which is studied below here.
Repairing Processes Against A Buckling Wall With Less Than Two Inches Of Inward Curve
Carbon Fiber Straps
If your wall has bowed or buckled less than 2 inches, carbon fiber straps are your best option. These are the fastest and easiest to install, requiring no excavation or exterior installation.
Carbon fiber straps are also the least expensive repair method. They are incredibly strong fibers woven together and adhered to your foundation with epoxy.
The epoxy glue is injected and will fixate the carbon fiber straps.
The process is to attach the carbon fiber frame to the top of the house frame, along the walls, and at the foundation’s footer. This network of carbon fiber pieces serves to distribute the outside pressure evenly across the foundation, putting a stop to unwanted shifts. The carbon fiber will hold up in the long term as well; it’s strong and unaffected by temperature changes.
A big advantage of using an externally applied, carbon-fiber reinforcement grid system is the speed and ease of installation. It permanently stabilizes bowed foundation walls with minimal disruption, no excavation, can be used in lieu of tiebacks, and is much cleaner than alternative techniques. Installers apply the crack repair epoxy through a static mixer, so no measuring or mixing is required. Once the epoxy cures (generally after 1 hour depending on temperature), the process is complete.
Be aware that not all carbon-fiber systems are installed the same way: some do not attach to the sill plate or floor and others have a necktie that attaches to the sill plate, but the strongest systems link the foundation base with the house framing. This is done by using a galvanized sill plate tie as well as a pin anchored into the footer.
In order to achieve the maximum benefit of carbon fiber, it needs to be properly connected to the structure’s foundation. It is necessary to attach the carbon fiber to the structures footer and to the sill plate. By tying the carbon fiber into the structure at multiple points, the stress placed on the foundation is evenly distributed. It is unsafe to only strengthen the wall at the point where it is bowed the most because you are shifting the stress load to a different part of the foundation; this causes the wall to shear at the bottom or collapse inward as a whole.
Benefits of Using Carbon Fibers for Basement Repairs
For homeowners, a carbon fiber system offers several key benefits:
- It is guaranteed to permanently stabilize foundation walls against lateral loads.
- Installation is fast with minimal disruption and mess.
- No excavation of property is necessary.
- It does not create obstructions in the room that can reduce floor space.
- The reinforcing material will not corrode, mildew, or weaken over time.
- The repaired surface can be painted or covered with white wall panels.
- The home maintains a higher resale value than when repaired with more obtrusive steel alternatives.
A carbon fiber repair that is properly linked to the foundation and house framing comes with peace of mind that there will be no further damage. Carbon fiber crack repair is a 12 wide repair that not only stops water infiltration but strengthens the foundation, preventing future cracks from developing. The repair is wide enough that it covers the main crack as well as any fractures or hairline cracks. This is important because what may be a hairline crack inside the basement is typically a much wider crack on the exterior.
How Are Carbon Fiber Straps Installed
Here is an overview of how such a system is installed:
- First, the foundation wall is prepared, which includes marking the position of each carbon-fiber strap and grinding vertically where they will be applied
- Second, the holes for the sill plate tie are marked and drilled
- Third, the sill plate tie is attached to the carbon-fiber strip
- Fourth, the sill plate tie is mounted in the pre-marked position
- Fifth, the strip is epoxied to the wall
- Sixth, the carbon-fiber pin is anchored into the footer and epoxied in place
Here are the supplies and tools typically used for the installation:
- Supplies: Carbon fiber straps, epoxy adhesive (in tubes), carbon fiber pin
- Tools: Grinder, power drill with ¼” and ¾” bits, hammer, level, caulk gun and nozzle, squeegee
- Hardware: Sill plate tie bracket, (2) 3/8 x 2 lag bolts, (2) flat washers
- Other: Marker, gloves, tape measure, scissors
Conclusions about the carbon fiber strap methodology against a buckling wall:
Carbon fiber fabric installs in tough strips on the foundation walls in order to reinforce the weakened areas. To install these, the areas where installation will occur are treated and applied with epoxy glue. Carbon fiber fabric strips are installed on the treated areas and the installation is complete. The installation is fast and relatively inexpensive.
This installation is better than some options, however it is also without its weaknesses. Because these strips are not installed along the entire length of the wall, the bottom portion of the wall can still crack and shift and the top portion of the wall can still be pushed inwards, causing leaning foundation walls. The installation relies on epoxy glue to be successful, and the carbon filter fabric cannot be used to fix walls with severe cracking or displacement. Finally, this method of foundation repair also cannot restore the wall to its original position as foundation anchors can.
Repairing Processes Against A Buckling Wall With More Than Two Inches Of Inward Curve
Wall Anchors
If your wall has buckled more than 2 inches, you will need either anchors or tiebacks. The decided factor between these two methods is your property’s size and shape.
Wall anchors require excavation into your yard, usually about 10 feet past the damaged basement wall. If this doesn’t cross your property line, or intersect with something significant (inground pool, septic system, garage, porch, etc), anchors are a good option.
Wall anchors can repair many bowing wall problems. Soil anchors are placed in the ground outside the home.
Steel rods attached to soil anchors extend through the foundation wall and wall plates.
Wall plates distribute clamping pressure. Tightening nuts on the threaded ends of the rods stabilizes the wall for a permanent solution.
These are a 3 part system consisting of 2 plates and a long connecting rod. We start by driving a long steel rod into the ground through a hole we drill in your foundation wall. The first plate is driven into the ground outside your home, 10-15 feet from your basement wall to ensure it is driven into virgin, undisturbed soil and over the rod we’ve placed through the ground. The second plate is inside your basement, attached to the rod (which is anchored on the outside plate) and slowly tightened to pull your bowing wall back into place. The tightening may require multiple trips for our team to tighten the plate and ensure your wall is back in its original location properly supporting your home.
As you can see from the illustration below, a large plate is buried in your yard- this is the anchor. A plate is attached to the damaged wall, and a post is drilled from the wall into the anchor. As it’s tightened, it pulls the wall plate and the wall securely together.
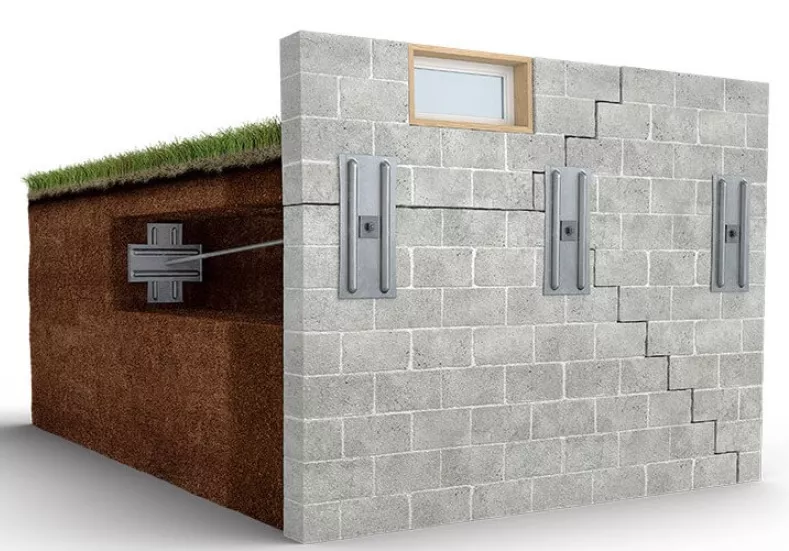
Wall anchors are designed with three main parts: an exterior earth anchor, an interior wall plate, and a connecting steel rod that. Together, they work to counteract the pressure being exerted against the wall.
When foundation anchors are installed, a small area of lawn is removed, and the space underneath is excavated. The earth anchor is placed inside the hole, and small is drilled through the Foundation wall from the inside. A steel rod is driven through this hole and is pushed out to the earth anchor in the yard. On the outside, an anchor is fixed on the rod, with a wall plate installed against the inside Foundation wall. This anchor is tightened against the wall, and the tightening process is repeated over time. Once the installation is finished, the hole is filled in, and the removed portion of lawn is restored.
Over time, periodic retightening of this anchor can potentially pull the wall back to its original position- a possibility that merely providing a brace cannot present. Foundation anchors are a cost-effective and fast installation, usually installing in a single day. Installation is possible year-round, and the job is completed with minimal disruption of the yard and with no need to replace the foundation.
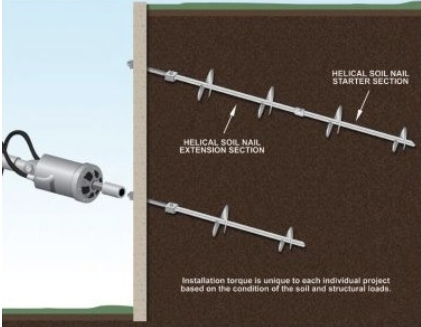
Helical Tiebacks
Helical tiebacks are not exactly the same as the helical piers or push piers that are used to level a foundation, but it is also an underpinning process, so in some way they are similar.
Carbon fiber straps have been utilized with success to toughen basement walls caving in or buckling.
However, carbon fiber straps do not remove the pressure causing the damage in the first place. Instead, it transfers it to other portions of the wall. Carbon-fiber reinforcement is widely used when there is only a small amount of damage. Helical tiebacks should be used in cases of moderate to severe movement and are often accompanied by the use of carbon-fiber systems.
If your wall is buckling 2 inches or more, and exterior excavation for installing wall anchors isn’t a good fit, then your best option is tiebacks. Helical tiebacks are the most expensive option, but they don’t require excavation like anchors do. Tiebacks are installed from inside your basement, through the wall into the yard.
Foundation wall anchors are slightly more effective solutions for bowing foundation walls. Helical anchors consist of a long rod with a corkscrew end that attaches to a wall plate inside of the foundation wall. To install these, large holes are created in the wall (or in the case of block walls, blocks are removed) where the anchors will be installed. A helical anchor is drilled through this hole into the soil. The hole is refilled with concrete, and the wall plates are installed.
Helical anchors are commonly used in the repair of both concrete retaining walls and basement walls, transferring tension loads from the existing foundation to a soil suitable for the load. In order to stabilize bowed basement walls using tiebacks, it’s necessary to relieve the pressure pushing on the walls by removing the soil around them. The helical tiebacks can then be installed into deeper soils that will resist the pressure and allow the walls to be pulled back into alignment. After the tiebacks have been installed and the walls are held in place by the helical piling, the hole is backfilled with gravel, which does not exert as much pressure as soil does when soaked with water. This reduces the force on the walls to help prevent future bowing.
Helical tiebacks are advanced into the soil away from the area placing pressure on the wall, then pull against the interior with a wide plate to spread out the load. This stabilizes the wall by providing enough resistance to negate the outside forces.
Before considering the use of helical tiebacks to fix bowed basement walls, be sure they are suitable for your location and soil conditions. In some cases, tiebacks are not allowed due to property lines, because installation may require extending them 20 feet or more. If there is a neighbor with a basement closer than that, you may not be able to install a tieback system. Also, areas with dense rock are not favorable to helical tiebacks.
Somewhat similarly to anchors, a plate is attached to your basement wall. The steel tieback is driven through the wall and angled downward, deep into the ground. Once the tieback reaches the correct resistance (measured during install by hydraulic gauge), it’s secured to the wall plate to hold the wall in place.
The tieback anchor is installed horizontally through the foundation or retaining wall and driven to an engineered specification and required torque. Then a steel wall bracket is installed on the wall to divert and distribute the pressure.
This system provides a quick and easy installation, it is portable, and can be installed in contained areas.
The weaknesses to these systems are important to remember. The large holes in the block weaken the structure, and when they’re filled in, it’s very difficult to make them watertight, which can lead to flooding later. The soil that these anchors are bracing against is disturbed by the corkscrew’s drilling into it. Heavy equipment must be used during the installation, and the process tends to be very expensive. It’s certainly better than steel beam reinforcement, but this is still not the best option.
Powerbrace Foundation Repair
PowerBrace(TM) is a patented foundation wall repair system that stabilizes failing basement walls and can help to straighten walls over time. This product is a great option when access to the yard outside of the home is not possible but bowing, buckling wall problems need to be solved.
The PowerBrace(TM) is an I-beam system that has several advantages over traditional “old school” systems. This includes its rust-resistant zinc coating and a design that makes it possible not only to stabilize bowing foundation walls but also to straighten these walls over a period of time.
We have already described more in detail the Powerbrace system in this article.
Steel Beam Foundation Reinforcement Against A Buckling Wall
Similar to the Powerbrace system, we have the reinforcement of a buckling wall with steel beams
To install steel beam foundation support, the floor along the foundation walls must be jackhammered where the beams will be placed. The beams are then installed and bolted to the wooden floor joist above. The pressure bearing against the wall is transferred to the wood floor joist, which can lead to damage and buckling in the floor above.
Because the pressure against the wall itself is not addressed, there is still great pressure against the walls. This continued pressure can widen the cracks, and over time, even cause the steel beams to bend.
This installation has many other shortcomings. Because the steel beams are straight, rigid supports, they will only touch the foundation wall where it’s bowed outwards the worst- the rest of the wall will not be supported. These beams are also large and awkward, and their installation causes the homeowner to lose several inches of living space while forcing them to remove drywall panels for the installation. Finally, the installation merely braces the walls, whereas other foundation repair methods can provide a way for homeowners to actually straighten and repair the wall as well.
Wall Straightening Against A Buckling Wall
I want to emphasize that the goal with all three of these repair methods is to restore stability to your foundation.
Once your wall is repaired, it will not bow any further. If you want to straighten the basement wall and return it to its original position, this will require wall straightening.
Wall straightening is a different approach to repairing a buckling wall. It requires excavation, so the wall can be pushed back upright and help in place with jacks. Once the wall is fully upright, it will need to be secured with carbon fiber straps, wall anchors or tiebacks. Then, the excavated area can be filled back in with soil.
Let´s see the wall strengthening process in more detail.
This process requires quite a bit of work, with the process beginning in your yard. Before the foundation is excavated, the yard around your foundation must be removed. This includes all landscaping such as gardens, steps, walkways, foliage, and everything else located along the foundation. Then the foundation will be excavated, with the removed soil being laid in mounds around the house. Temporary supports will be put in place as the foundation walls are removed and replaced. When the job is completed, the landscaping and dirt can be returned. A year later, this soil will settle and must be regraded.
Again, this is sometimes the only thing that can be done for a failing foundation. However, this solution is very expensive, invasive, and disruptive when installed. Additionally, the process merely replaces the foundation that failed. If you haven’t taken any measures to address the problem that damaged the foundation in the first place, it’s likely that this foundation will fail, just as the previous one did.
